Thursday, December 20, 2018

WINDOWS LOADS WITH TEMPORARY PROFILE

WINDOWS LOADS WITH TEMPORARY PROFILE

How to restore the correct user profile after Windows starts logging in with a temporary user profile.
The first step, if the profile is not completely corrupt, is to rename the temporary profile registry key and revert the correct profile back.
  1. Log in with your temporary profile if your account has administrative rights or with the local administrator account.
  2. Start the registry editor and navigate to HKLM\SOFTWARE\Microsoft\Windows NT\CurrentVersion\ProfileList

  3. Look for the profile with the ".bak".  This is the CORRECT old profile.

  4. Rename the profile that does not have ".bak" by adding "_new" to the end.  You can really add anything to change the name of this profile, just be sure to rename the profile with the matching SID.  Next remove the ".bak" from the correct profile.


  5. Log off and then log back in with the profile that was problematic.  It is possible that Windows will undo everything you have just done and rename the profile again.  If this happens you can try running a Check Disk on the partition that contains the user profiles.  You will need to re-do all the steps above, run Check Disk, and restart.  If this doesn't correct the issue, you will need to remove the offending profile and recreate it.
To remove the domain profile and recreate it:
  1. Follow the above steps to clean up the registry, then log in as a local administrator.
  2. Navigate to the profile directory C:\Users\NetID and back up any data that is needed from the profile.
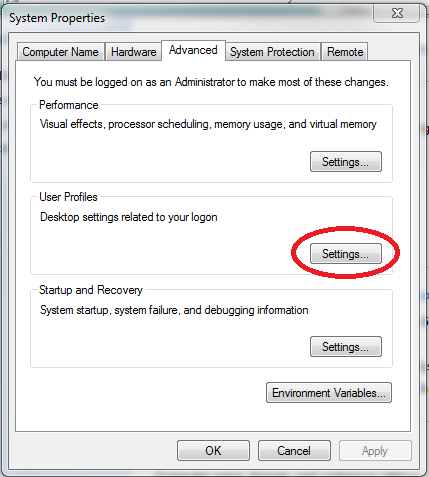
  3. Navigate to All Control Panel Items>>System>>Advanced system settings>>Settings


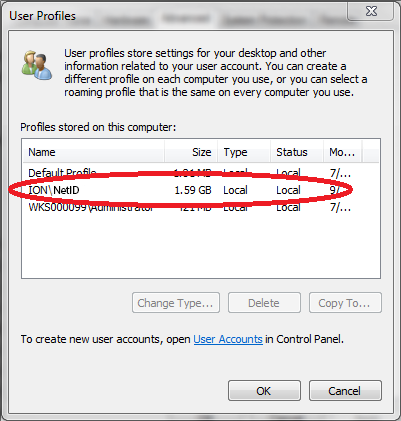
  4. Locate the corrupt profile ION\NetID and Delete this profile.


  5. Navigate to C:\Users and make sure the folder titled by the corrupt profile NetID is gone.  If not, delete this folder.
  6. Log out or restart and log back in using the previously corrupt NetID profile.  Windows will build a new profile for this NetID from the Default profile.
  7. Restore any data to the profile that was previously backed up.

Tuesday, December 18, 2018

You can’t connect to the file share because it’s not secure. This share requires the obsolete SMB1 protocol.

With Windows 10 v1803 or Spring Creators update released I have decided to do a fresh installation on my PC. Once everything was done I have tried to map network share on my Popcorn Hour VTEN media streamer. Unfortunately, I wasn’t able to do so as it seems that Microsoft disabled SMB1 protocol with this release.
When I have tried to map a network drive I have received the following error message:
You can’t connect to the file share because it’s not secure. This share requires the obsolete SMB1 protocol, which is unsafe and could expose your system to attack.
You can't connect to the file share
Since Popcorn Hour is using Linux and the latest available update is installed I didn’t have many options to fix this problem. In order to fix this, I had to install and enable the SMB1 protocol by using Powershell.
Here’s how to do it:
Run Powershell command processor in elevated mode (run as admin)
Type the following command:
get-windowsoptionalfeature -online –featurename smb1protocol
Once SMB has been installed please type the following command to activate it:
enable-windowsoptionalfeature -online –featurename smb1protocol
Once done, press Y and hit enter to restart your computer.
You can't connect to the file share
Please have in mind that SMBv1 protocol is now obsolete and that Microsoft strongly advises consumers to use SMB2 or higher protocol. If you really need SMBv1 protocol like I do I would recommend you to enable SMBv1 only when you are using this network share. When you don’t need to access the share you can disable the SMBv1 protocol with the following command:
disable-windowsoptionalfeature -online –featurename smb1protocol